How to schedule an Importer
This guide will take you through setting up Import WP Pro to schedule an importer, along with some useful tips along the way.
Table of Contents
Configuring the cron / task scheduler
Import WP Pro has two methods to process scheduled imports / exports, the first and faster method is to use the custom cron runner, which is the preferred method and improves import/export performance. The second method is to use the built in WordPress cron.
Configuring Import WP Pro custom cron
Import WP Pro’s custom cron was added in v2.9.0, to speed up imports and work with ImportWP new compatibility settings to selectively disable plugins to improve performance.
Enabling the custom cron can be done by adding the following constant into your WordPress config file wp-config.php , replacing ‘your-cron-secret’ with a string containing only numbers and letters.
define('IWP_CRON_TOKEN', 'your-cron-secret');With the IWP_CRON_TOKEN set this will disable the importer from being triggered by the built in WordPress cron, and instead you will need to setup a scheduled task runner to run every minute on your server, remembering to replace ‘your-cron-secret’ with your previously set string.
Using wget
wget --spider "https://example.com/wp-load.php?iwp_cron_token=your-cron-secret"or
wget --delete-after "https://example.com/wp-load.php?iwp_cron_token=your-cron-secret"Configuring the WordPress cron
Import WP schedule is run using the WordPress Cron system, the ideal setup cron setup is to have have it run every minute via the servers task scheduler, here is a good article on setting up the WordPress cron.
Running an import on a Schedule
An importers schedule settings can be found on the edit importer screen under the “Run Import” step, at the bottom of the form is a radio button labelled “Schedule”, click this to open the schedule settings.
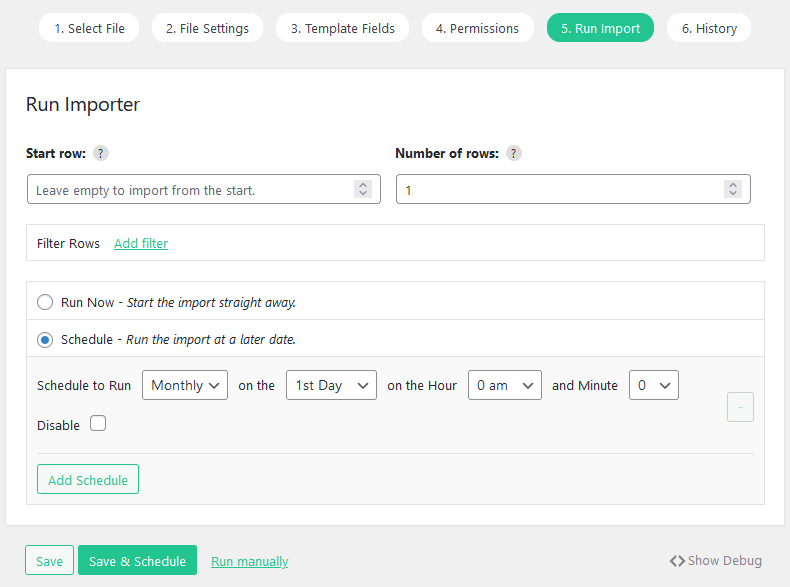
Clicking on the dropdown menu labelled “Schedule to Run” allows you to change the frequency of the schedule (Monthly, Weekly, Daily, Hourly), each option has further dropdowns menus to define the schedule futher.
The “Add Schedule” button allows you to create multiple schedule patterns.
To save and complete the schedule hit “Save & Schedule”.
Understanding Scheduled notifications
Importer notifications are displayed at the bottom of each importer on the Importers archive screen, or displayed at the top of the edit importer form. These notifications allow you to see what step the schduled importer is on.
Importer is waiting to being scheduled
The following notification displays when the importer is waiting on the WordPress cron system to process the schedule, either after an import has complete or after importer settings have been changed.
The following example notification shows that the importer has been waiting 36 seconds.

Importer is scheduled
Once an importer has been scheduled to run, the date and time of the schedule will be displayed at the start of the notification.

Import progress message
The running notification is not specfic to Scheduled imports, this shows the current progress of the importer.

Clicking on the cancel button will stop and reschedule the current import.
Import is waiting on the WordPress cron
When a running import has “Waiting on WP Cron” at the start of the runnng notification, this means that the importer has is waiting to be resumed via the WordPress cron system, the following example shows that it has only been waiting for 6 seconds.

How to Increase the import timeout limit
The importer timeout limit determins how long a scheduled import task can run before stopping and waiting for the next WordPress cron to resume it.
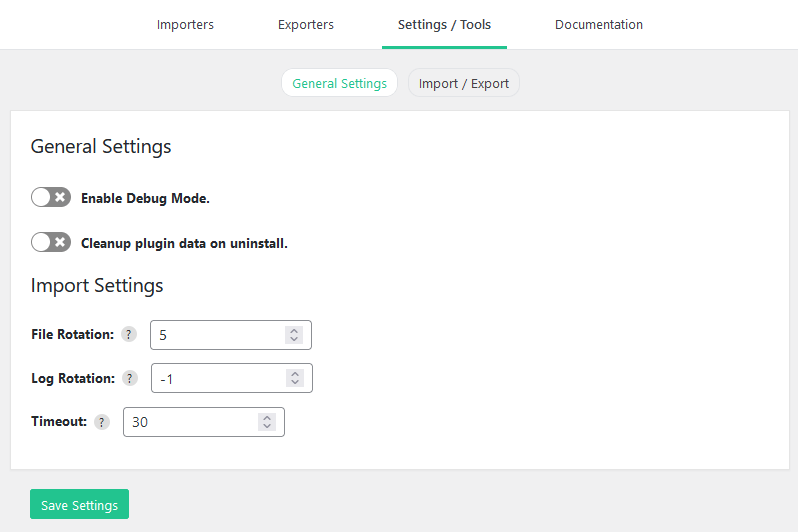
The timeout limit can be changed under Settings / Tools > General Settings section, under the field labelled “Timeout”, in the following example it is set to 30 seconds.
Increasing the timeout limit can speed up imports, but can also cause errors due to some hosting companies automatically ending long running processes without warning.
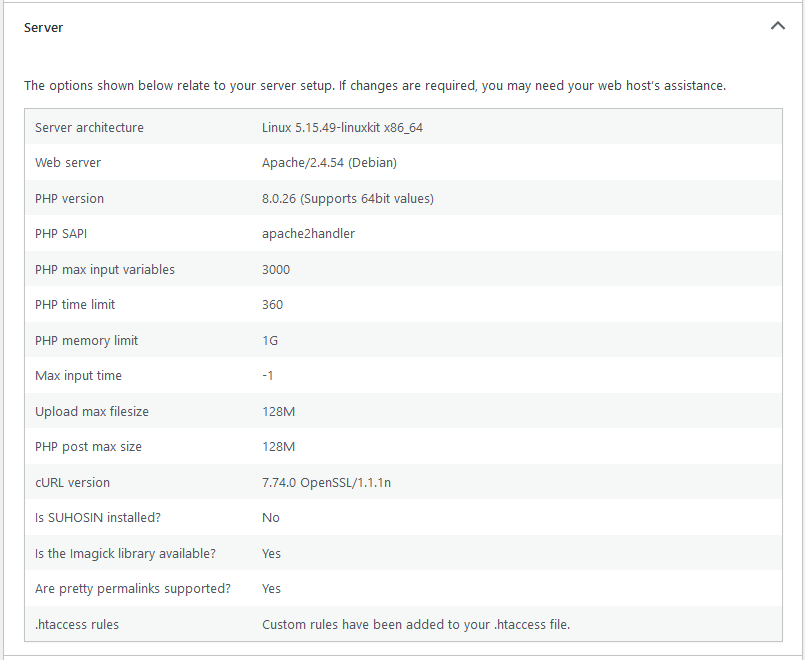
A good idea is to find the servers php timeout limit, this can be found in the WordPress site health section under the “PHP time limit” label (Tools > Site Health > Info > Server), and set the importer timeout to this value.